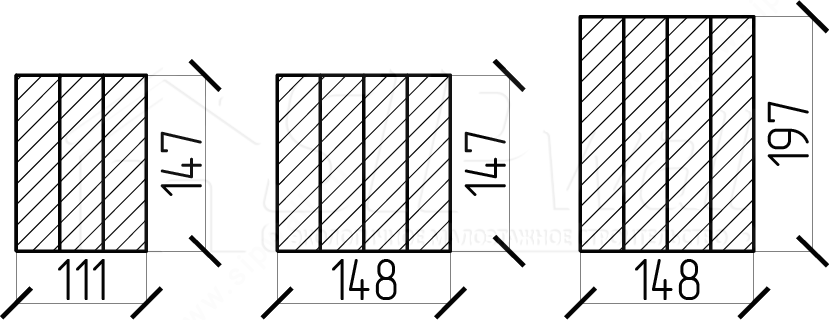
- Cross-section diagrams of the main beams and posts used
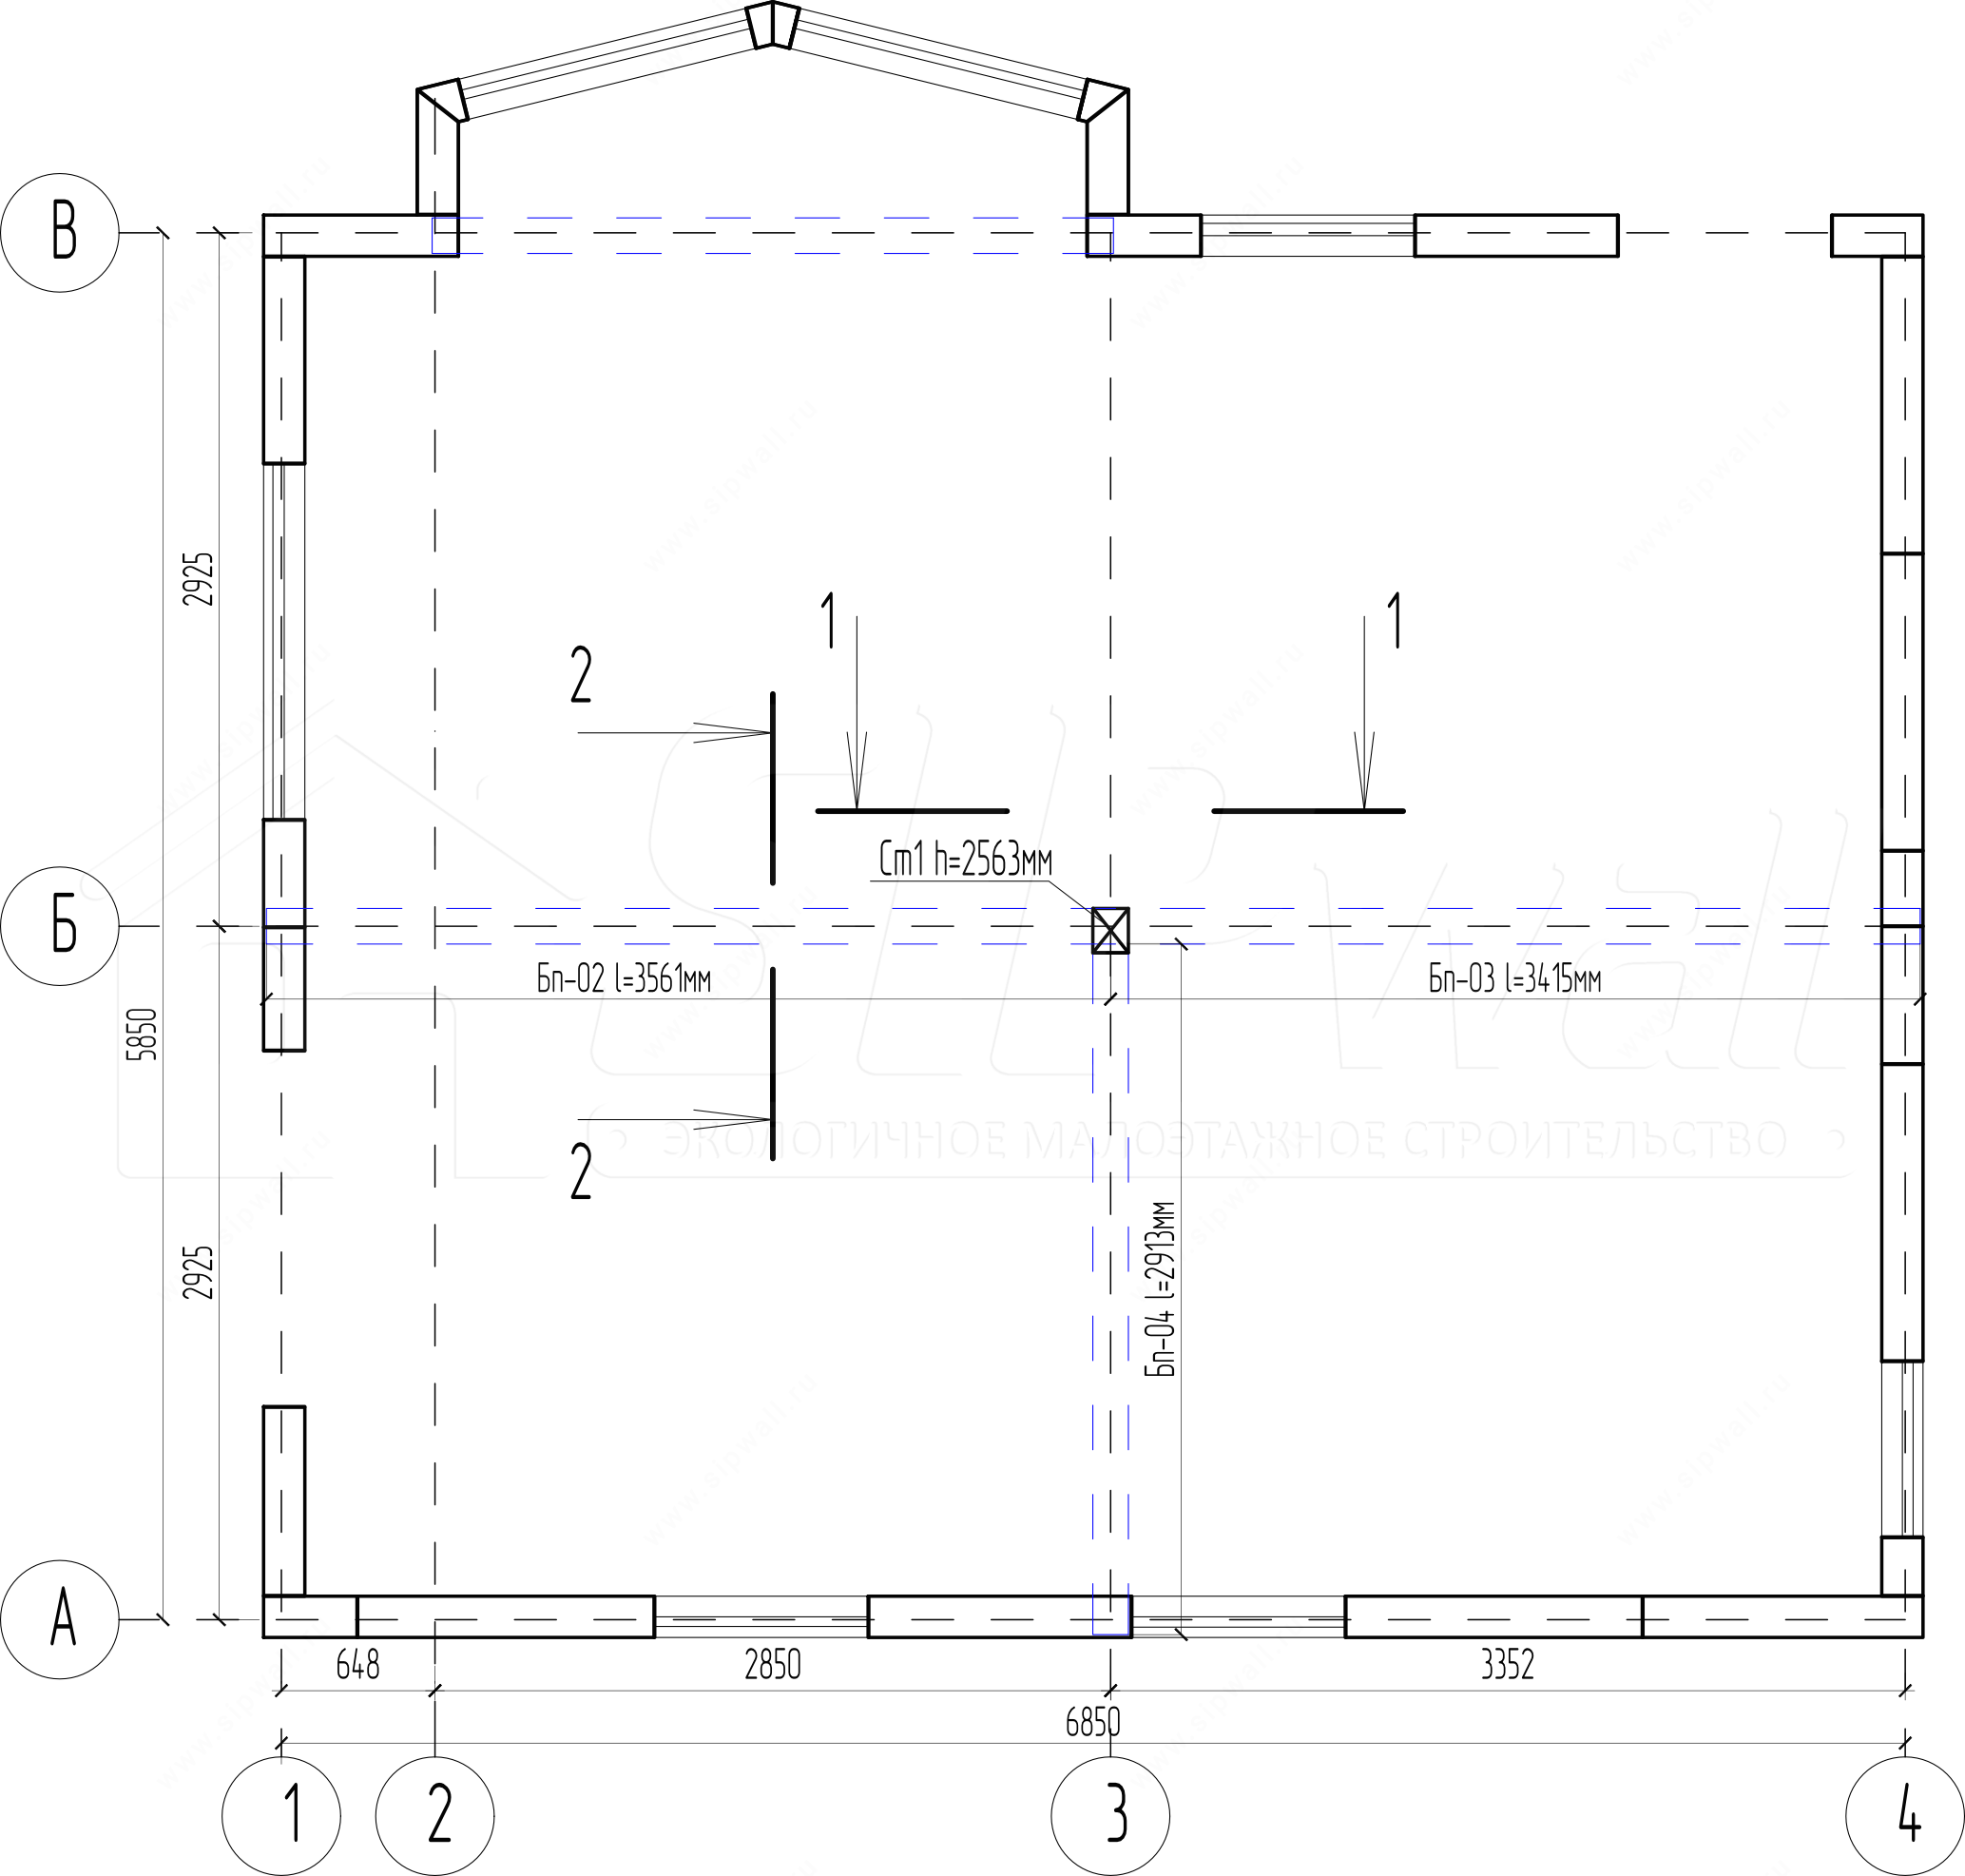
- Posts and beams inside the House
- Posts and beams in the attic
Requirements for transporting, stacking and storing glued laminated timber structures (GLT)
- When transporting, stacking and storing (as well as installing) GLT, the condition of the structures must be monitored, taking into account their specific features:
- – the need to protect them from prolonged exposure to the weather;
- – protecting the GLT from mechanical damage, dirt, direct moisture and sunlight during loading, transport, unloading and storage;
- – keeping the number of turning and re-stacking operations during loading, unloading and installation to the minimum possible.
-
Before GLT and components are delivered, the construction site must be equipped with an area with a canopy or a storage room for them (unless the construction work plan provides for installation straight from the vehicle).
Note − rolled roofing or waterproofing materials, roofing sheets, etc. may be used to build canopies that keep precipitation and direct sunlight off the GLT.
Canopies must be built so that water running off them and slanting rain do not reach the structures. The GLT must be ventilated continuously. The storage area must be level and in a dry place, with drainage of ground water, meltwater and storm water. Clear it beforehand of grass, wood chips and debris, and in winter of snow. - To avoid the “greenhouse effect”, it is not recommended to store GLT in airtight, vapor-tight packaging that prevents constant airing and drying.
Note – GLT usually arrives on site in packs. The GLT is wrapped in film on all sides, which keeps precipitation from wetting the timber in transit.
If stored improperly on site, the factory film can be damaged and become permeable. Moisture trapped inside the packaging can quickly cause mold on the timber. - After GLT is delivered to the construction site, the factory packaging must be opened from below to ventilate the structures and allow water that has accidentally got in through damaged film to drain away.
- On site, GLT should be stored in a position close to the design position, with a distance of at least 0,5 m between the underside of the structures and the ground.
- To keep GLT intact during transport, stacking and storage, use reusable or custom devices (cradles, clamps, containers, wide soft slings), with soft pads and spacers where the GLT rests on or touches metal parts, and protect it from sunlight and alternating wetting and drying.
-
When GLT elements are stored in stacks, it is recommended to place them on spacers thick enough for the lifting gear to grip the element freely. Spacers in successive rows are placed strictly one above the other. Spacers must be at least 30 mm thick and at least 20 mm higher than the lifting loops and other protruding parts of the GLT elements. The number of spacers and the distance between them must prevent the GLT elements from sagging or deforming. The stack is placed on timbers at least 100 mm high and covered against precipitation. Placing GLT and its elements directly on the ground, and walking on them, are not allowed.
Note − special attention should be paid to storing GLT on site. Structures must not be left uncovered for a long time, as this spoils their appearance and reduces their performance: cracks and delamination appear, the protective coating is damaged, and the timber is exposed to wood-destroying organisms − because the factory treatment of GLT is designed to protect it only for a relatively short period.
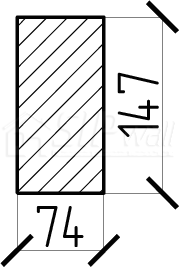
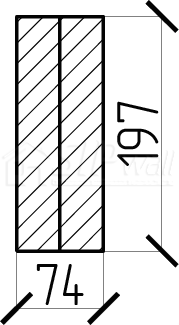
1. Cross-section diagrams of the main beams and posts used
Glued beams
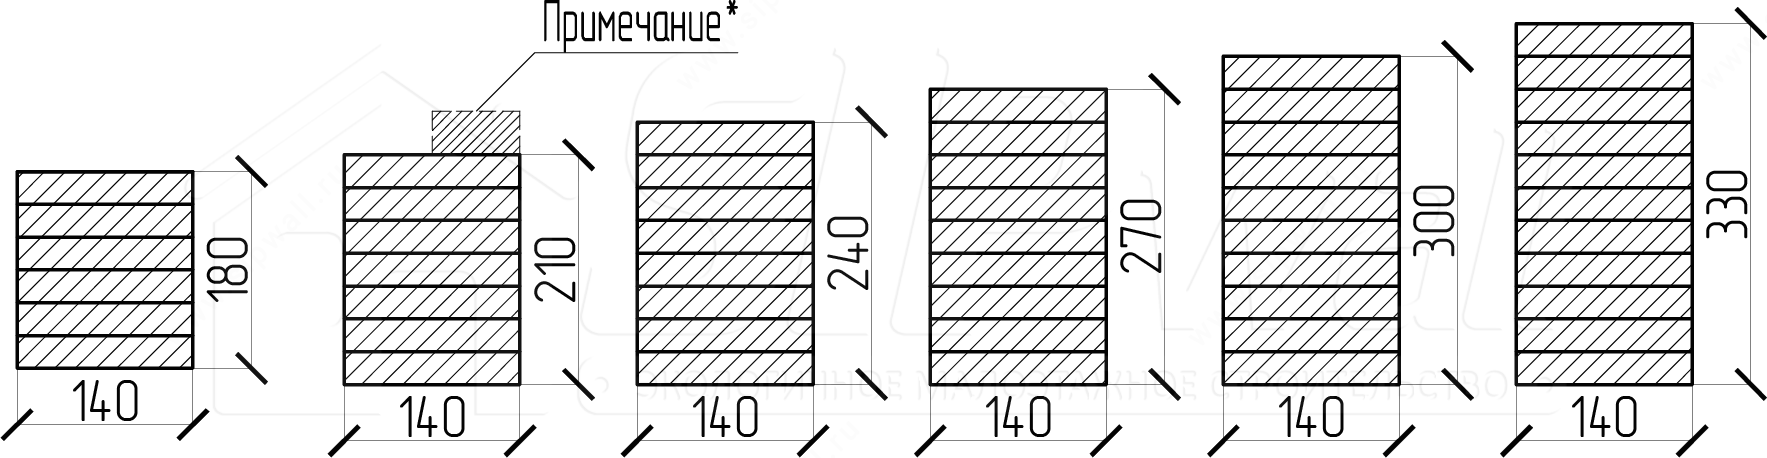
Built-up beams
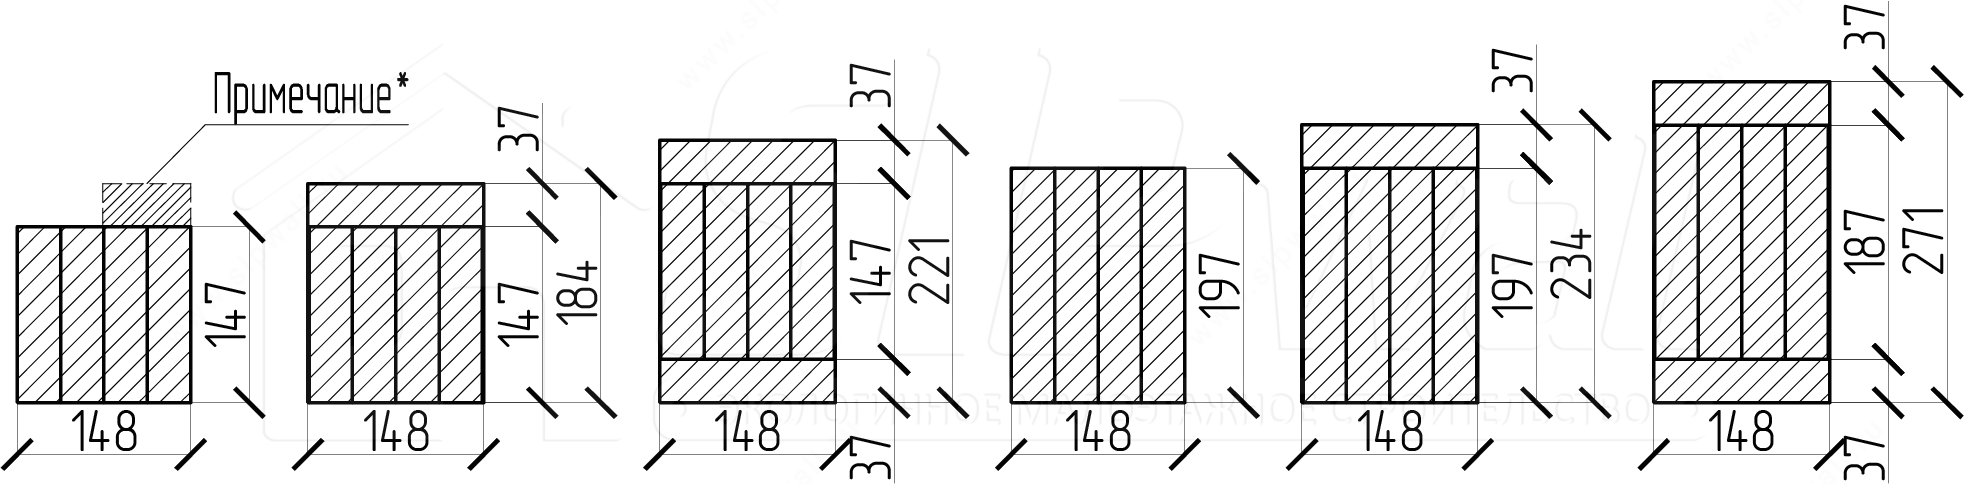
Note:
* For all beam sections with an additional board fixed on to create a slope for the structures above.
Solid timber
Composite timber made of two boards
Built-up posts
Requirements for assembling and installing glued laminated timber structures
-
Assembly and installation of prefabricated GLT may begin only after all metal connections have been tightened, defects arising in transport and storage have been corrected, and the positions of purlins, spacers, etc. have been marked out.
Attention! Structures that have or have acquired defects or damage in transport and storage that cannot be corrected on a construction site (for example, delamination of glue joints, through cracks, etc.) must not be installed.
- Installation resumes after the person who prepared the design documentation (the designer) has issued a conclusion on whether the damaged structures may be used, need strengthening or must be replaced.
-
During installation, GLT must be protected from the weather. The time between erecting the structures and building the roof should be as short as possible.
Note – the upper faces of load-bearing GLT must be protected with waterproofing materials.
2. Posts and beams inside the House
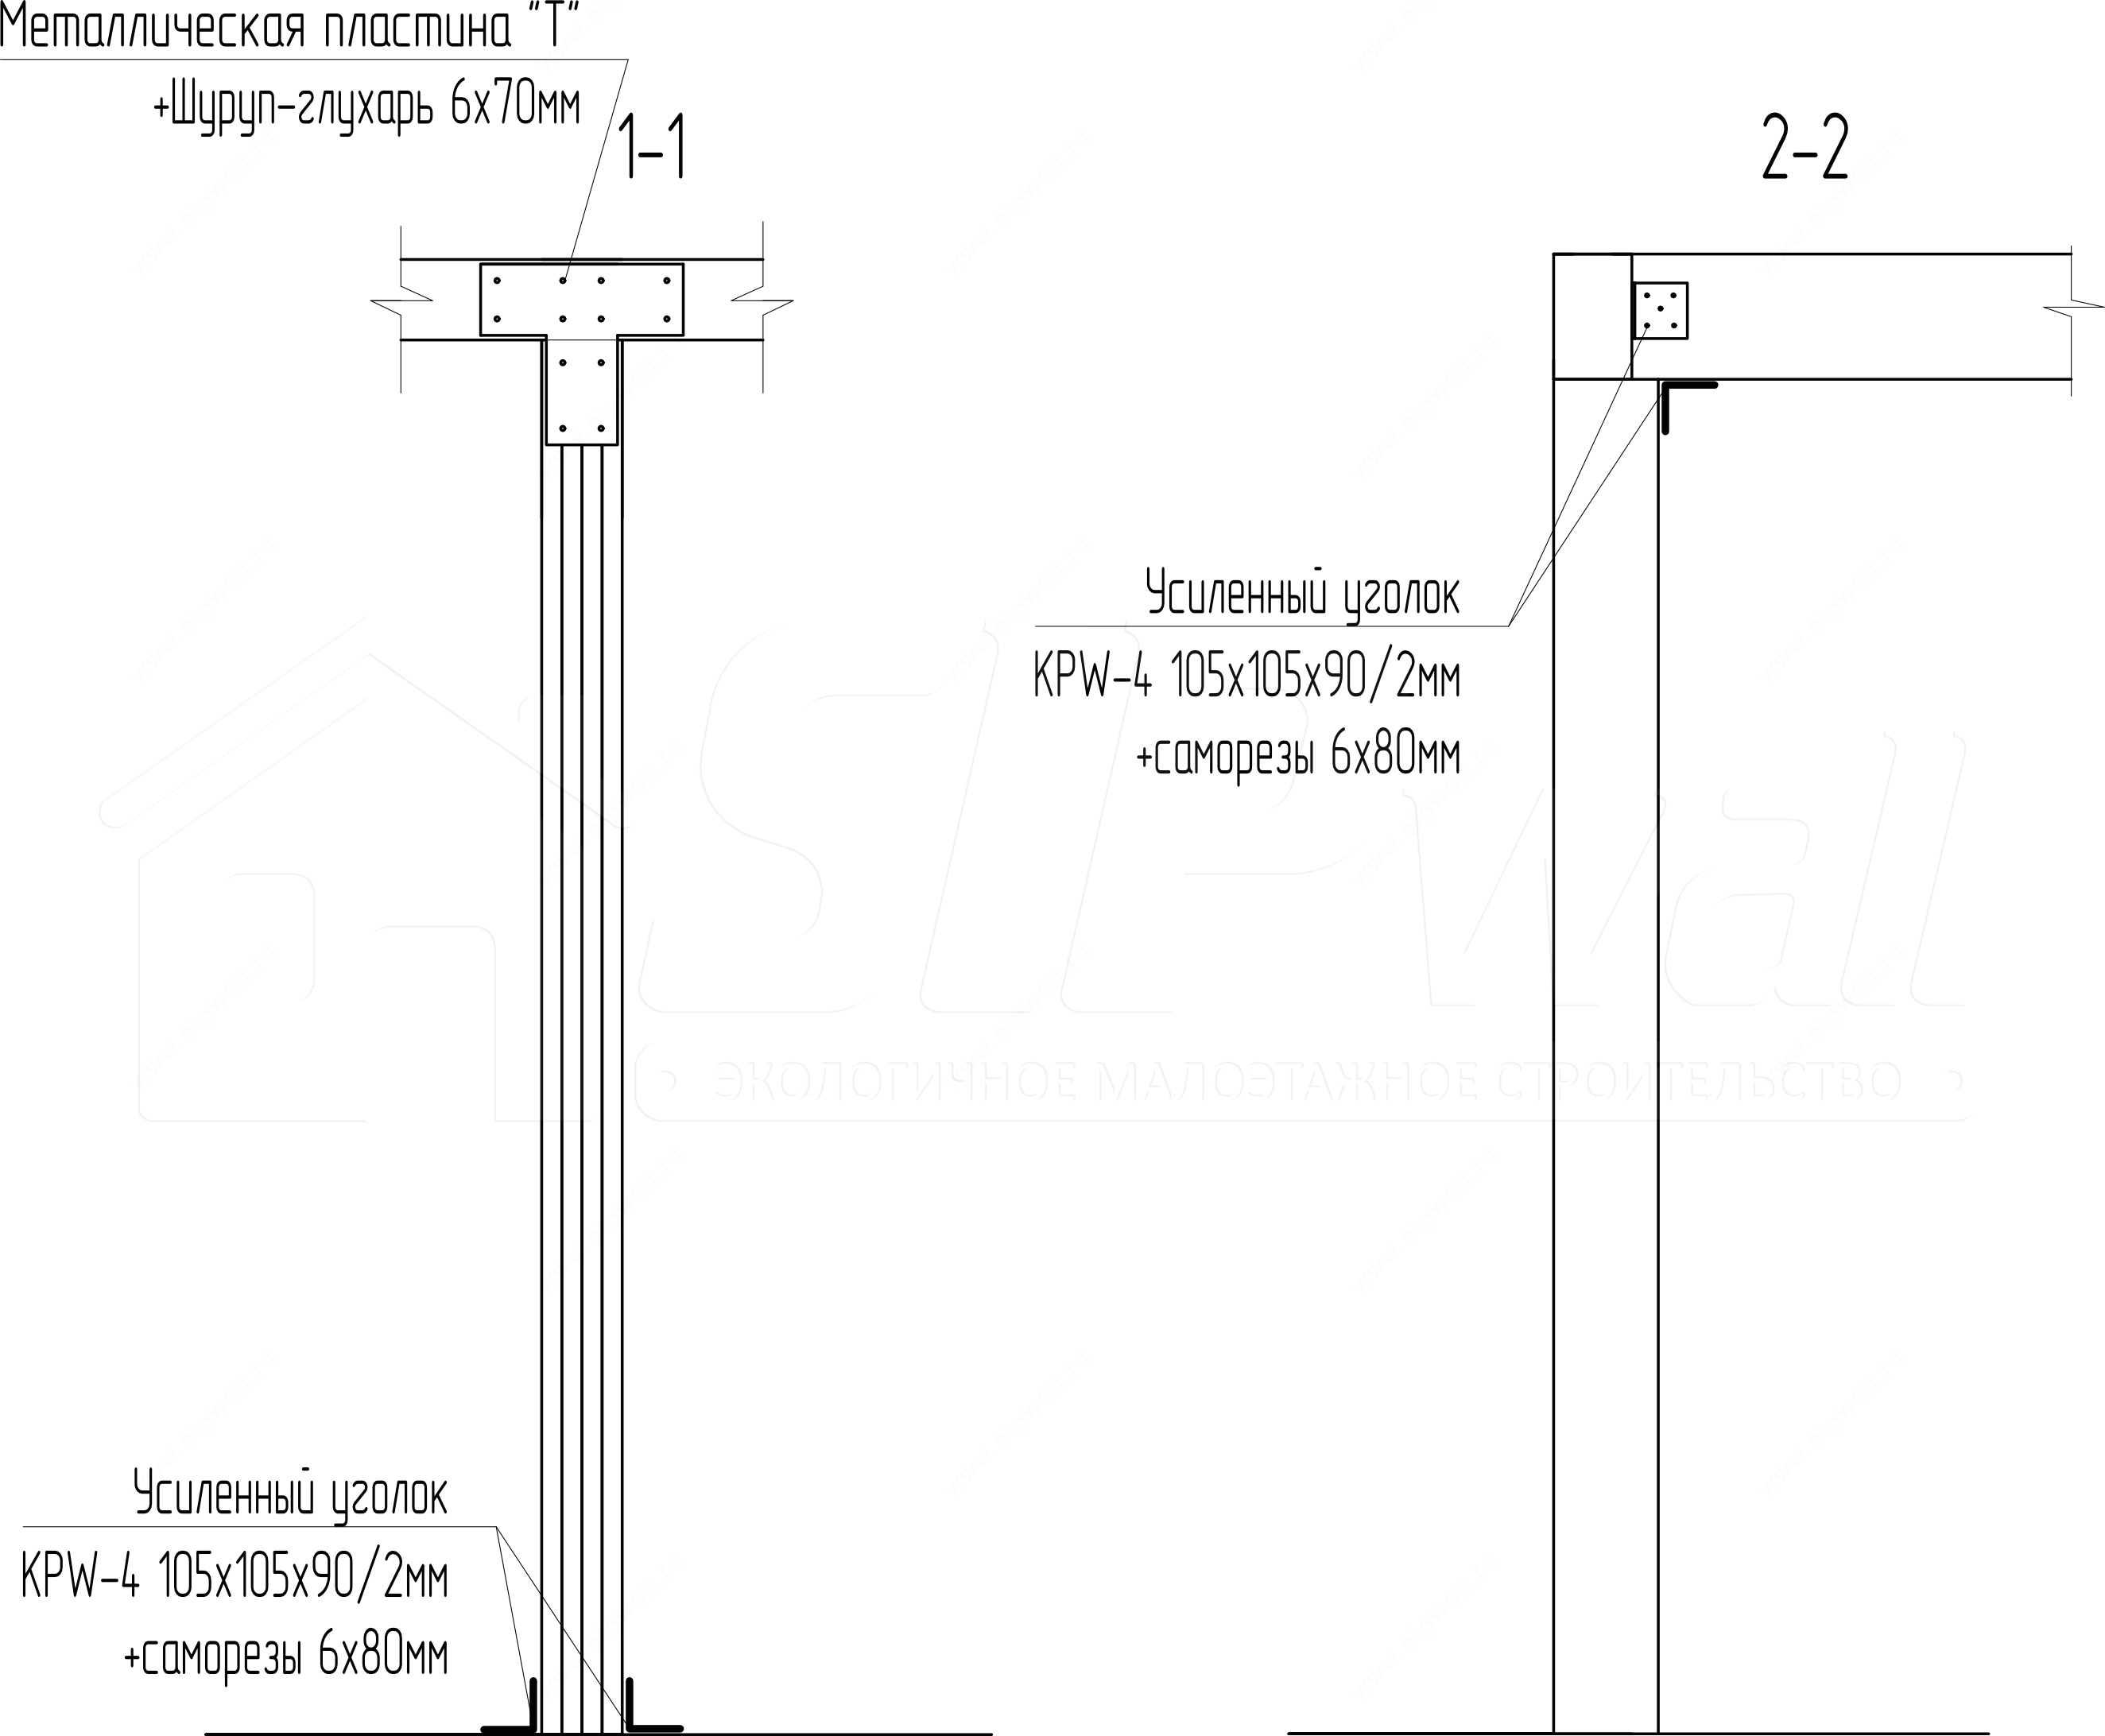
Note:
1. Fix the posts to the built-in floor joists with reinforced angle brackets KPW-4 (105 × 105 × 90 × 2,5 mm) and screws 6 × 80 mm.
2. Fix beams and posts to each other with reinforced angle brackets KPW-4 (105 × 105 × 90 × 2,5 mm) and screws 6 × 80 mm.
3. At a support, join the beams along their length with a metal “T” plate and lag screws 6 × 70 mm.
3. Posts and beams in the attic
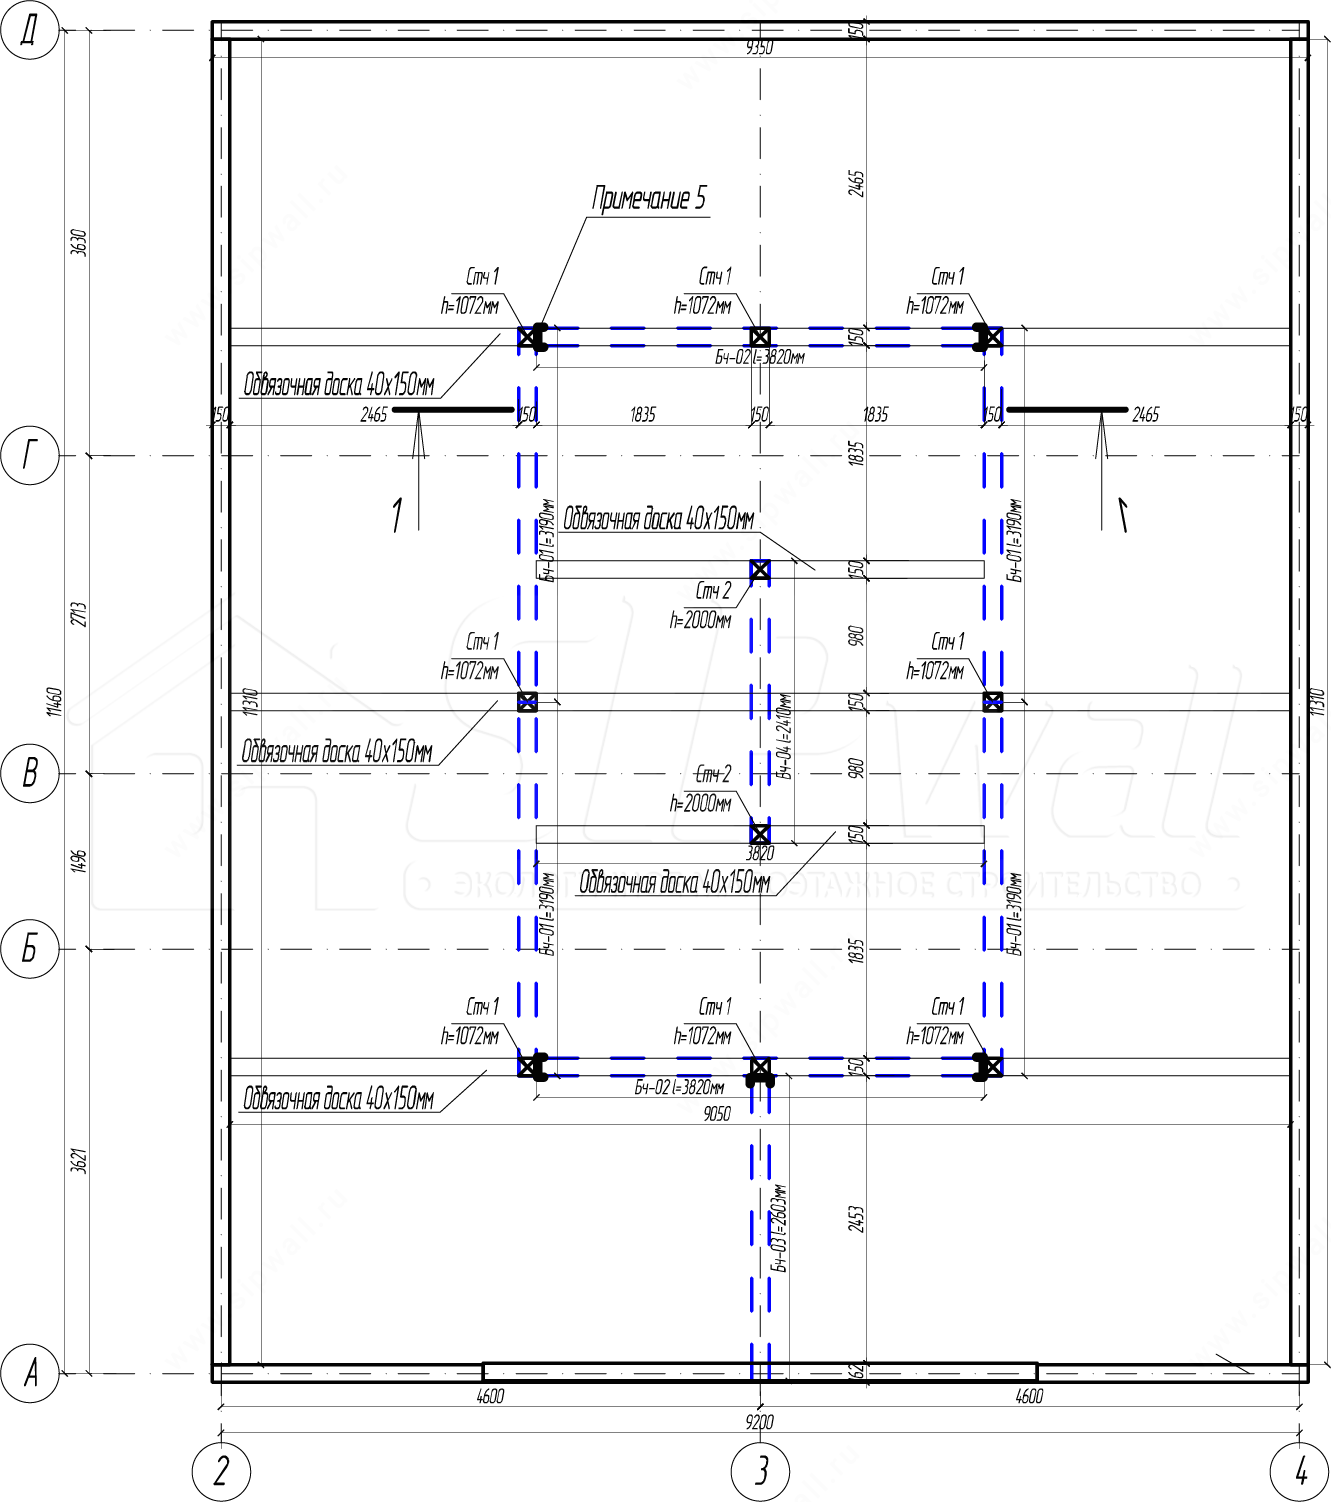
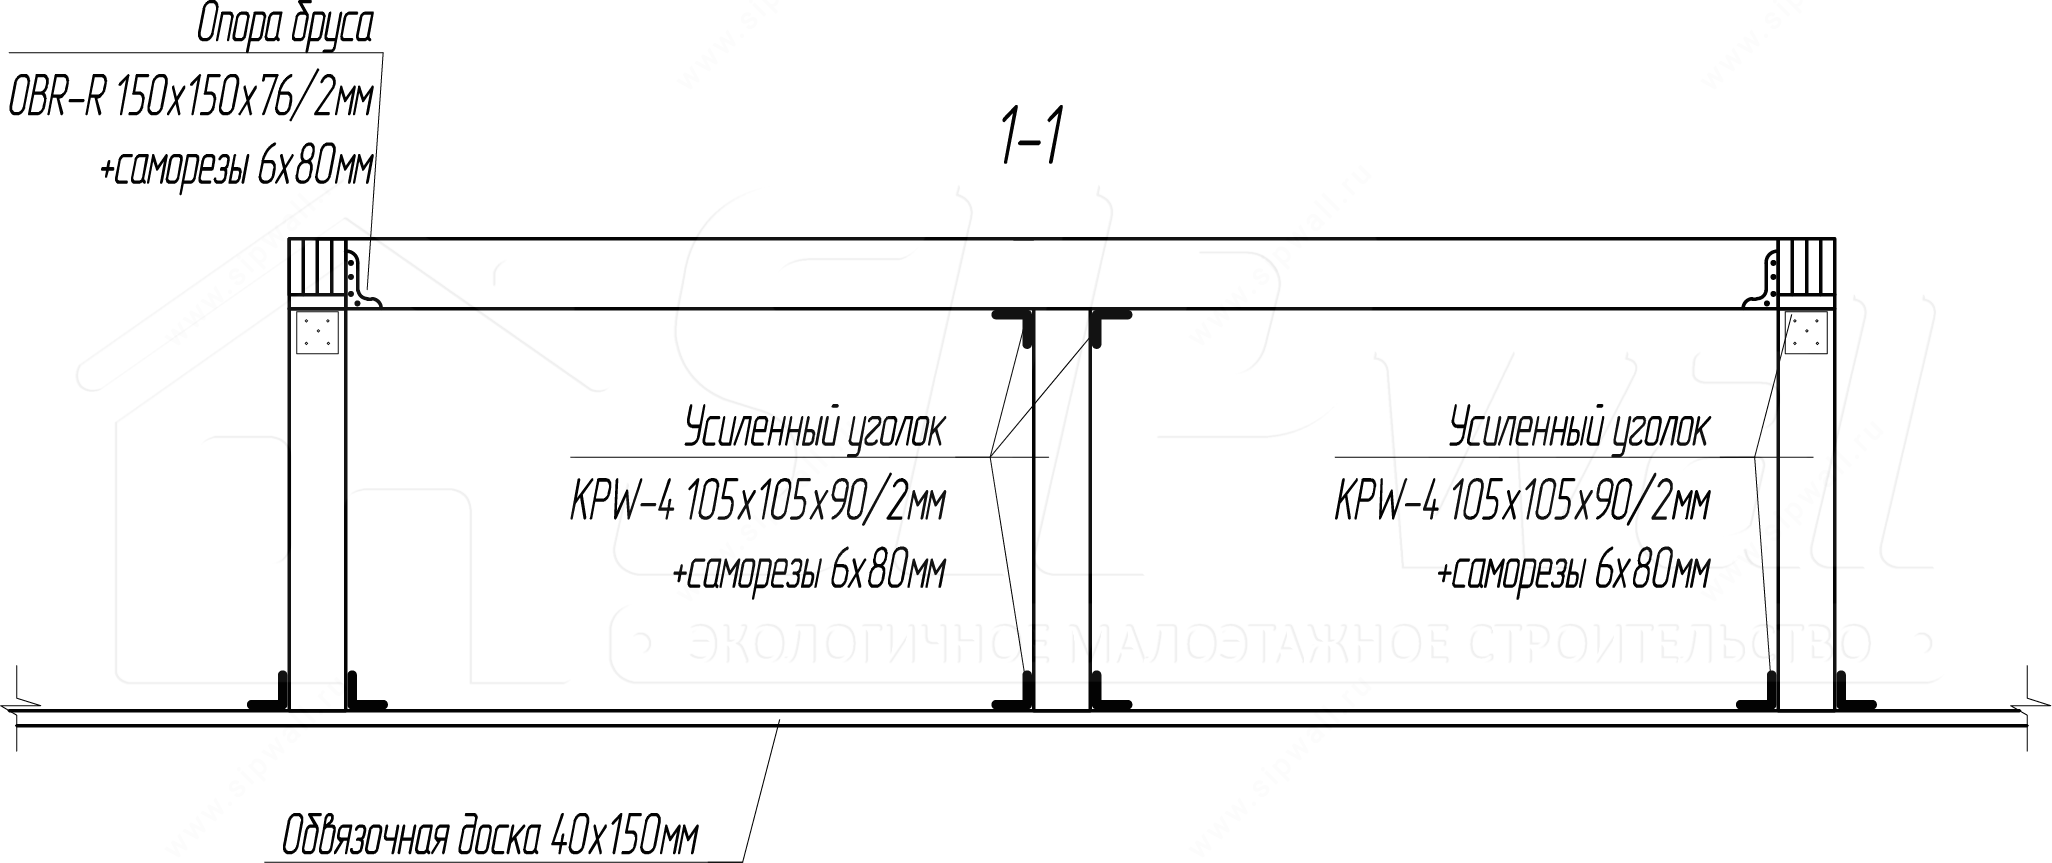
Notes:
1. Fix the attic posts to the strapping board with reinforced angle brackets KPW-4 (105 × 105 × 90 × 2,5 mm), screws 3,5 × 41 mm, and screws 6 × 80 mm into the post itself.
2. Fix the attic beams to each other with reinforced angle brackets KPW-4 (105 × 105 × 90 × 2,5 mm).
3. Fix the beams with an OBR-Z timber support 150 × 150 mm (closed) and screws 6 × 80 mm.
4. Fix the support board to the floor joists with screws 4,2 × 90 mm, 2 pcs. per joint.
5. Trim on site, allowing for the thickness of the timber support.